Yes, this is free for only the hosting setup part; you still need to pay for a domain and the electricity bill. At this point I consider this is a reasonable expense.
This website is hosted with exactly the same setup as mentioned in this post.
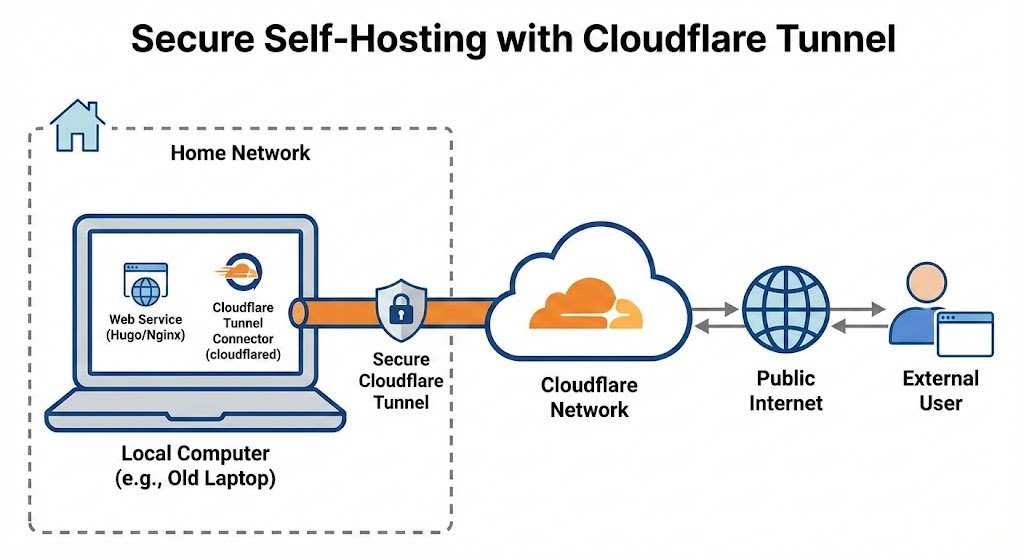
Back in the day, around 2007 I self-hosted a SA-MP (San Andreas Multiplayer–yes GTA: SA has multiplayer) game server that anyone could join, it required to directly forwarding my router port to the outside world which many, many years later, I realized is something you definitely don’t want to do.
I used to wonder how could I safely self-host a website or server in my house. The reason I do this is that I prefer not to subscribe (in this case is for a Virtual Private Server) if I don’t need to. At the same time, I have an old laptop that nobody uses anymore, with enough core and memory that pretty much the same as small VPS.
Then, one day, I came across a YouTube video by NetworkChuck. Thanks to him, the content was easy-to-follow and contained the fundamentals of setting this up–exactly what I was looking for.
I will share how I self hosted this website.
Tooling Link to heading
Everyone has their own taste when it comes to favorite tools, and I keep changing my tooling to gain experience through my personal projects.
In this project I use:
- Mise for installing other tools.
- Taskfile for the scripts (this tool’s purpose is just like
Makefile). - Hugo for the website static site generator. I use the
extendedversion. - Terraform for infrastructure deployment.
- Cloudflare Tunnel for hosting; this is the main component to expose local services to the public!
Project files Link to heading
These files are assumed to exist in the project (I place them in the root directory) and also should be ignored in .gitignore file:
.env.compose: Environment variables specific for thecompose.yml(Docker)..env.web: Environment variables forwebservice image (I use Nginx)..secret.cloudflare-tunnel-token: The CloudFlare tunnel secret token; this is sensitive information.
The overview of the project file structure:
├── web
│   ├── archetypes/
│   ├── assets/
│   ├── config
│   │   └─ nginx
│   │      └─ templates
│   │         └─ default.conf.template <-- Nginx configuration template, only applicable for nginx Docker image.
│   ├── content/
│   ├── data/
│   ├── i18n/
│   ├── layouts/
│   ├── public/ <-- Generated with `hugo build` or `hugo server`
│   ├── resources/
│   ├── static/
│   ├── themes/
│   └── hugo.toml
├── .env.compose
├── .env.web
├── .secret.cloudflare-tunnel-token
├── Dockerfile
├── Taskfile.yml
├── compose.yml
└── mise.toml
Static site generator Link to heading
I like to try new tools that click with me. I’ve used templ for building a site in the past. I was interested with the idea of SSR (Server Side Rendering); with templ you can write HTML components in Golang (the language that I used for the backend). Of course it comes with its own complexity, but at least I can learn new things along the way.
But this time I chose using Hugo instead for another experience. This is my first time using it.
First we need to setup hugo.toml configuration file in the project directory (web/hugo.toml). If this is your first
time using it, I recommend to just pick a theme that you like from here and iterate from there, then you
might as well as create your own theme.
Time is money.
It is highly recommended to start with a theme; this is also included in the quick-start section. I started from scratch and wasted a long time to even figure out how to properly render the site.
The custom configuration varies based on the themes you choose or create. For more information about this tool, you
can check out the official documentation.
Using Docker Swarm Link to heading
Docker Swarm is optional here, and using Docker Compose should be enough. However, recently I was using it in another project, and here I also want to use the same stack.
If you are interested to enable swarm mode to your Docker, you can follow this docs. Even better you could ask AI about these fundamental information; this is how I use AI, though.
The service is simple, for the website service (web) image itself, I host the generated contents with Nginx.
Here is the compose.yml file looks like:
# compose.yml
services:
  web:
    image: ${WEB_IMAGE}
    env_file: .env.web
    deploy:
      update_config:
        order: start-first
      resources: # It's a best practice to always set the resource reservations and limits.
        reservations:
          cpus: "0.10"
          memory: 10M
        limits:
          cpus: "0.30"
          memory: 30M
    volumes:
      - ./web/config/nginx/templates/:/etc/nginx/templates/
    ports:
      - ${WEB_PORT}
    networks:
      - net
networks:
  net:
    name: ${COMPOSE_NETWORK_NAME}
    external: ${COMPOSE_NETWORK_EXTERNAL:-false}
Inside of the .env.compose:
WEB_IMAGE=web
WEB_PORT=80 # If you want to publish the port, change this to for example 80:80
The Nginx template file looks like this:
server {
    listen              80;
    server_name         localhost;

    root /usr/share/nginx/html;

    error_page 404  /404.html;

    location / {
        index  index.html;
    }
}
The template file supports environment variables passed into the container and can be accessed in the configuration file e.g.
listen ${PORT};. For more information, see it here.
Finally, in the Dockerfile, I utilize multi-stage build for seperating tool installation from the actual final
image, inspired by Moby’s (Docker) Dockerfile. Here is what it
looks like:
ARG BASE_IMAGE=alpine:3.20.3
ARG BASE_WEB_IMAGE=nginx:1.29.3-alpine3.22

FROM --platform=${BUILDPLATFORM} ${BASE_IMAGE} AS base
WORKDIR /workspace

FROM base AS toolchain
## Installing tools script.
## ...
## ...
## Tools are all installed in /build/bin directory.

FROM base AS build-web
COPY --from=toolchain /build/bin/mise \
  /build/bin/task \
  /build/bin/hugo \
  /usr/local/bin/

RUN apk add --no-cache \
  # Hugo extended version dependencies
  libc6-compat \
  libstdc++

COPY --link ./web/archetypes/ /workspace/web/archetypes/
COPY --link ./web/assets/ /workspace/web/assets/
COPY --link ./web/data/ /workspace/web/data/
COPY --link ./web/i18n/ /workspace/web/i18n/
COPY --link ./web/layouts/ /workspace/web/layouts/
COPY --link ./web/resources/ /workspace/web/resources/
COPY --link ./web/static/ /workspace/web/static/
COPY --link ./web/themes/ /workspace/web/themes/
COPY --link ./web/content/ /workspace/web/content/
COPY --link ./Taskfile.yml /workspace/

ARG BUILD_DRAFTS=false

RUN BUILD_DRAFTS=${BUILD_DRAFTS} \
  task build:web

FROM --platform=${BUILDPLATFORM} ${BASE_WEB_IMAGE} AS web
COPY --from=build-web /workspace/web/public/ /usr/share/nginx/html/
As mentioned, I write the build script in Taskfile; the actual script looks like this:
# This corresponds to `task build:web` in the `Dockerfile`
# for building the html static files.
hugo build \
  --buildDrafts="${BUILD_DRAFTS}"

# Building the docker image
docker buildx build \
  --platform linux/amd64 \
  --tag web:latest \
  --build-arg TARGETPLATFORM=linux/amd64 \
  --target web \
  --file Dockerfile \
  .
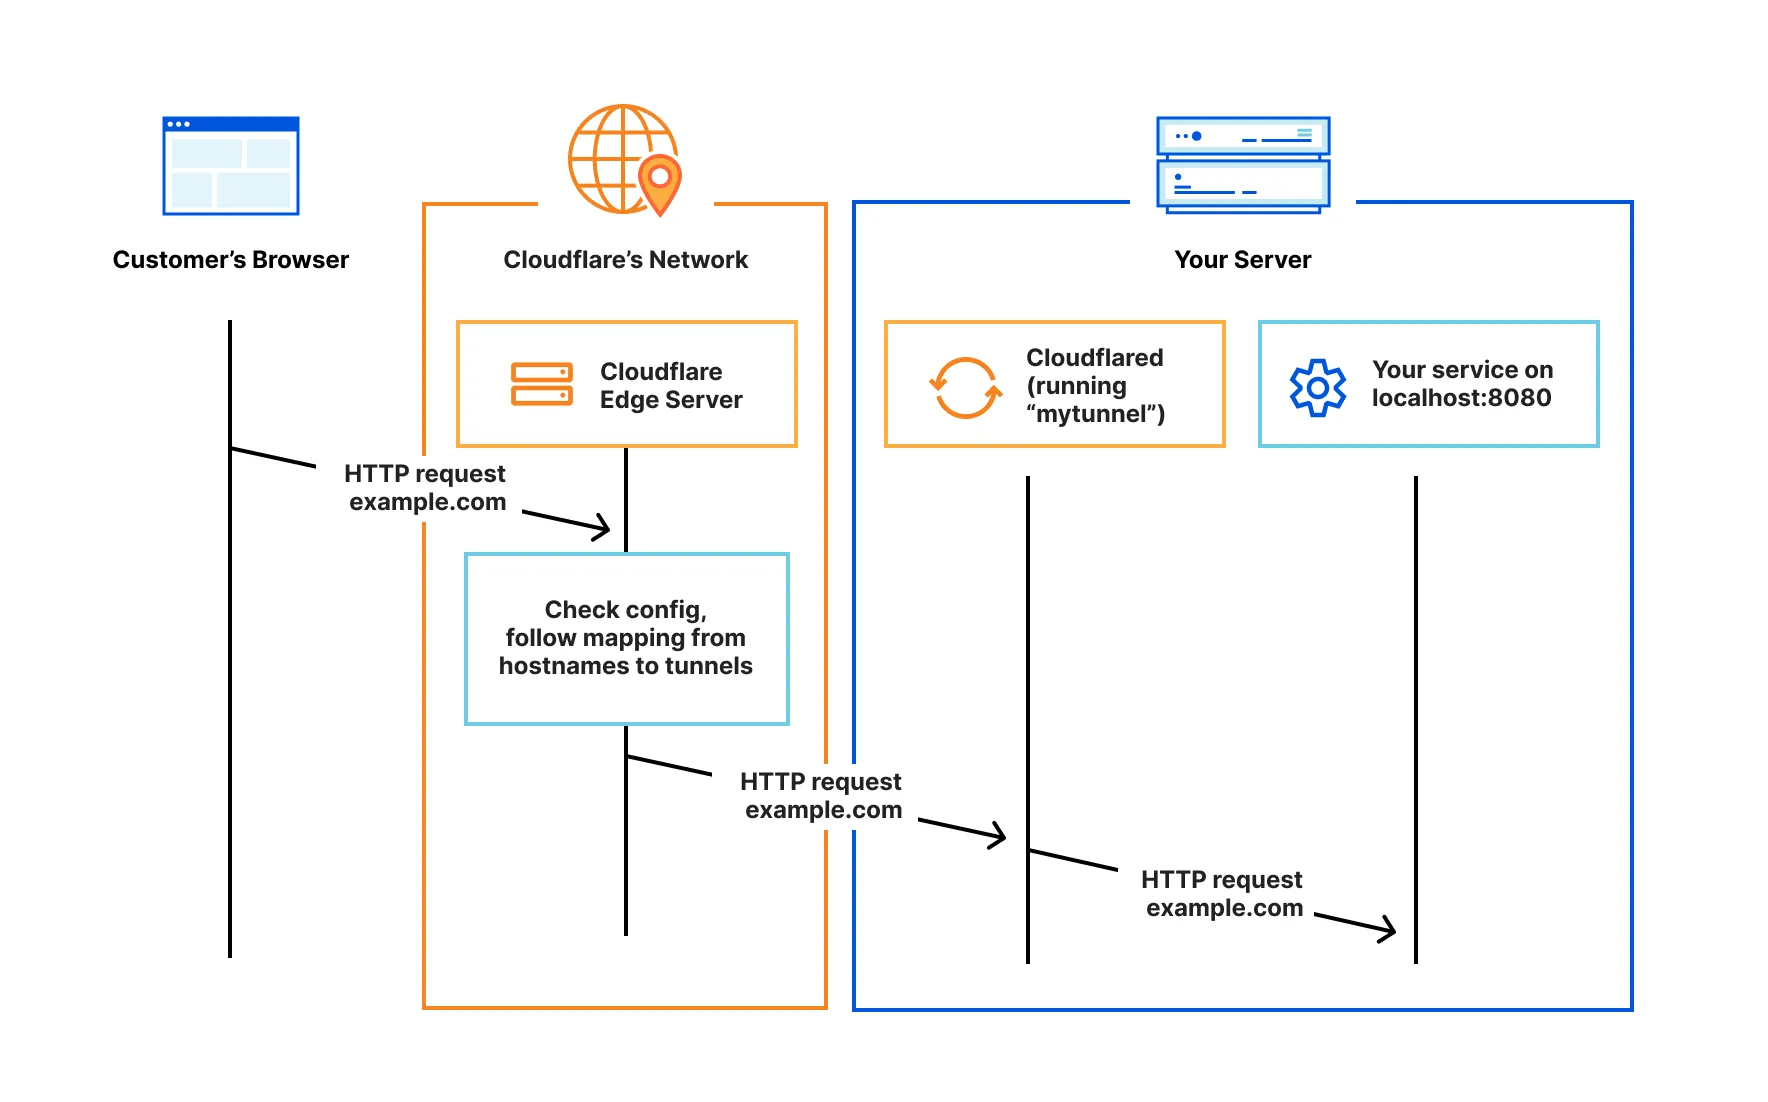
Cloudflare Tunnel Link to heading
Thanks to Cloudflare Tunnel, I can securely connect local services to the public internet, and it’s free!
I deploy the infrastructure with terraform, because why not.
Actually, looking for terraform resources to match manually configured resources from the dashboard is a lot of work, especially with Cloudflare provider resources, I often have to guess which resources to use. Setting up the required permissions for the API tokens is another challange. I usually try to deploy the resource first and if it fails, I check what API was called. Then I go to their API docs and look up the required permissions there.
The final terraform configuration values look like this:
# main.tf
resource "cloudflare_zero_trust_tunnel_cloudflared" "tunnel" {
  account_id = "ACCOUNT_ID"
  name       = "TUNNEL_NAME"
  config_src = "cloudflare"
}

resource "cloudflare_dns_record" "tunnel" {
  zone_id = "ZONE_ID"
  name    = "example.com"
  ttl     = 1 # in seconds, 1 means 'automatic'
  type    = "CNAME"
  content = "${cloudflare_zero_trust_tunnel_cloudflared.tunnel.id}.cfargotunnel.com"
  proxied = true
}

resource "cloudflare_zero_trust_tunnel_cloudflared_config" "tunnel" {
  account_id = "ACCOUNT_ID"
  tunnel_id  = cloudflare_zero_trust_tunnel_cloudflared.tunnel.id
  config = {
    ingress = [
      {
        hostname = "example.com"
        service  = "http://web"
      },
      # This is needed by cloudflare: the last ingress should not contain `hostname` or `path`
      {
        service : "http_status:404"
      },
    ]
  }
}
Conclusion Link to heading
I hope something in this post is useful for you.
At the same time, this post is a reminder for myself how I managed to achieved this setup and how I solved the problems.